Authentication and Scopes
Information on securely accessing Drift's APIs
We use the OAuth 2.0 Authorization Code flow to give you the credentials you need to talk to Drift on a user's behalf. As soon as you complete this flow, you'll automatically begin receiving your selected events for their account as well.
Drift uses the Auth2.0 protocol for authorization
- we'll redirect to your website with a one-time use code
- you'll exchange that code for a refresh token and an expiring token
- when your token expires, you can use the refresh token to get a new one
Confused about the flow? This website does a great job explaining OAuth 2.0.
1. Direct the user to the Drift OAuth URL 👉
Send the user from your site to a url that looks like:
https://dev.drift.com/authorize?response_type=code&client_id=CLIENT_ID&redirect_uri=REDIRECT_URI&state=1234zyx
The redirect_uri should be set in the setting page of your app, and the one you pass in should match the one there.
State is a random string generated by your application. We'll send the same state you give us back with your code to verify we're giving the code to the right person.
2. We'll redirect to your site 👈
When a user approves giving access to your app, we'll send them to your configured redirect URL with code and state parameters.
For example, if your configured URL is:
https://drift.com/app_install
you can expect a call that looks like:
https://drift.com/app_install?code=EMaSR7kxMIWGpalXPeIdxix2Ko7KMStw?state=1234zyx.
You can configure your redirect URL on the OAuth & Permissions page of your integration.
3. Exchange your code for tokens ↔️
The code you receive in the URL is a one-time-use token that can be exchanged for a permanent token. To exchange the token make a POST to the URL
https://driftapi.com/oauth2/token
with an application/x-www-form-urlencoded body containing the parameters:
client_id- the client id provided in your developer settingsclient_secret- the client secret provided in your developer settingscode- the code you received in the URLgrant_type- the type of exchange you're performing - set this toauthorization_code
The endpoint will respond with a JSON response that looks like:
{
    "refresh_token": "gSr0qvjrPkSr45wLtMNVOPvIKJqWz4zY",
    "access_token": "oQfB1088dZLkZeIH87VKxTThNYLxlnqA",
    "token_type": "bearer",
    "expires_in": 7200,
    "orgId": 123
}
This access token can be used to make requests to your customer's account using an Authorization header like:
Authorization: Bearer oQfB1088dZLkZeIH87VKxTThNYLxlnqA
where oQfB1088dZLkZeIH87VKxTThNYLxlnqA is your access token.
The expires_in parameter describes the time (in seconds) until the access_token expires.
The orgId parameter is the organization who has installed the app. This is also present on any events you receive so you can keep track of who's who.
You'll want to save theses tokens for each of your customers who connect.
4. Refresh your tokens 🚿
When your token expires, you can use the refreshToken from above to get a new accessToken and refreshToken.
To exchange the refresh token, make a POST to the URL
https://driftapi.com/oauth2/token
this time with an application/x-www-form-urlencoded body containing the parameters:
client_id- the client id provided in your developer settingsclient_secret- the client secret provided in your developer settingsrefresh_token- your refresh tokengrant_type- the type of exchange you're performing - set this torefresh_token
This will respond with a JSON object that looks the same as the one above only with different values to store:
{
    "refresh_token": "c0gIrn6Fdvt2XEgnQP96HwxSEbNN7tbV",
    "access_token": "ALIpkjv3bSS8C88WZ4eAOblLLwKqmiYD",
    "token_type": "bearer",
    "expires_in": 7200,
    "orgId": 123
}
use TLS protocol instead of SSL
Our API is configured with TLS encryption. If you're getting a
Connection was forcibly closed by the hostexception, try switching from using SSL to TLS.
Scopes ✅
Drift Apps use scopes to specify the general actions they'll be able to take on a user's account. When a user connects your app, they'll approve access to the scopes that you choose here. The scopes your app requests can be found under OAuth & Permissions.
Here are the different scopes your can request access to:
| Scope | Description |
|---|---|
contact_read | Allows an app to listen to changes to contacts and query contacts |
contact_write | Allows an app to create and update contacts |
conversation_read | Allows an app to query conversations and messages in an organization |
conversation_write | Allows an app to create messages via a bot. |
user_read | Read user data |
user_write | Modify user data |
gdpr_read | Perform data retrieval requests |
gdpr_write | Perform data deletion requests |
Testing your flow 📝
Once you've set up your redirect URL, head over to the main Drift app and find your Drift app on the Apps page. If it's installed already, uninstall it and reinstall it from that page.
Once you accept the installation, you'll be redirected to your URL with a code attached. As soon as your page exchanges that code for a token, you'll see the app as installed on the apps page.
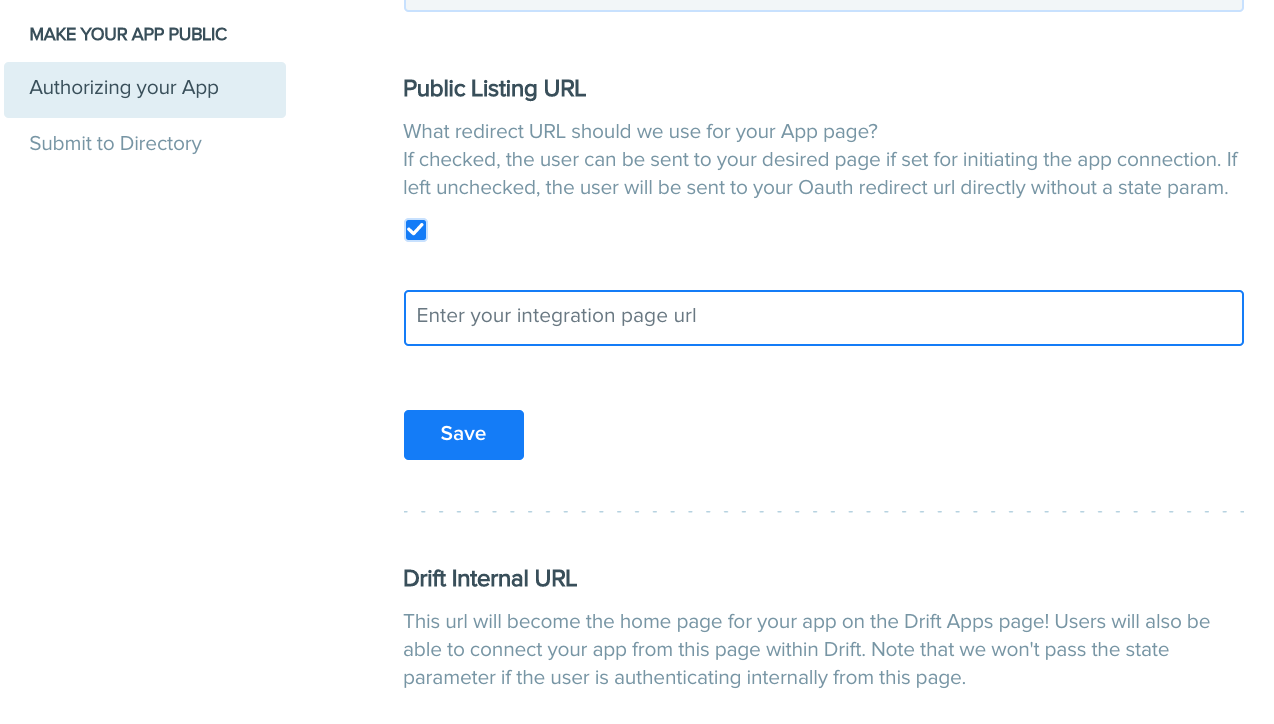
Authorizing your App
For apps that have been submitted to review, and have been approved, the final app page could have one of two versions:
- The Drift app page goes directly to the Oauth flow.
- The Drift app page links out to the integration web page of your choosing.
See the following image; this is controllable from your app settings on dev.drift.com

This setting only applies to apps that are approved and become public on the Drift integrations page.
Updated over 4 years ago
